Pages

Friday, March 30, 2012

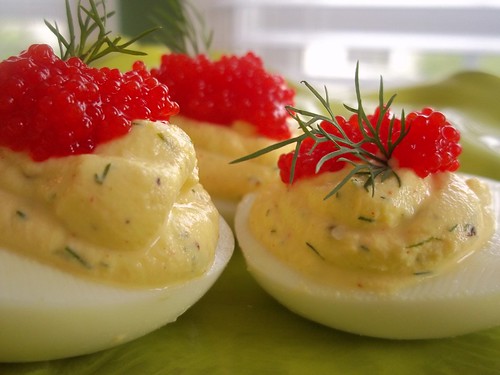
Dilled Devil Eggs with Caviar


                                                     Sink your teeth into these beauties!!! 


A small jar of caviar goes a long way and I still have a bunch to use up yet.  My sisters and I always make a batch of Deviled Eggs for Thanksgiving and I figure with Easter coming up next weekend this recipe is timely.  I also had plenty of dill leftover from last weeks snack recipe.  The only thing I didn't have on hand, believe it or not, was mayonnaise.  I know right? Who doesn't have mayo in the fridge?!?  No worries though we have like a gallon of nonfat Greek yogurt so I substituted with that.  Which dropped the calorie count on these way down. 

Here's what I used:
5 fresh eggs
2 tsp fresh dill chopped
1/4 C Nonfat Plain Greek Yogurt
pinches of salt, pepper, Cayenne pepper, garlic powder
1/2 tsp yellow mustard.  

snackersdelight.blogspot.com

First your eggs should look exactly as mine do after they have been hard-boiled.  Perfectly yellow and fluffy and no obnoxious odor.  

If you have a green ring around them or if they smell like sulfur than you'll want to follow my directions.  I know there are a lot of over the top techniques out there, like poke a whole in the bottom or let them sit in the hot water after boiling them or how about cooking them in the oven.  But really folks boiling an egg IS NOT ROCKET SCIENCE!

Place your eggs in a  2 quart sauce pan, cover with cold tap water and place on stove over a medium flame.  Set the timer for 20 minutes.  Go do something.  When the timer goes off drain the water from the pot leaving the eggs in the pot.  Fill pot with ice and cover that with water, let the eggs in ice water sit on the counter for 10 minutes.  Peel the eggs immediately.  That's it, nothing more, nothing less.  :) 

Cut your eggs in half, lengthwise.  Remove your perfectly cooked yolks from the egg white.  Place the whites on a plate and set it to the side for later.  Place the yolks in a small bowl and mash the yolks with the back of a fork.


Once the egg yolks are crumbled into small uniformed sized pieces it's time to add some spices and seasonings. 


I've added dill, salt, pepper, mustard and nonfat Greek yogurt.  The yogurt is very bland so adding spices is so important here.  The garlic powder is a definite must add otherwise you'll be standing at the counter as I was saying " Hmmm something is missing!"

Oh and these are Deviled Eggs so gotta add a bit of the devil.  Shake a couple of dashes of Red Pepper Cayenne in there.  In my opinion the more the better, but kids were going to be eating this batch as well so I had to use it sparingly.  Stir it all up into a smooth paste.

Once you've got it all mixed up and tasting the way you want, use a spatula to scoop your mix into a Ziploc baggie.  Seal the baggie except for about a quarter of an inch at the top.  Snip off one of the bottom corners about a 1/4- 1/2 inch.  You are now ready to pipe for filling into those egg whites over there.

Gently squeeze the filling into the cup of each egg white.  Evenly distributing to fill all of the cups. Get fancy make some swirls and pointy peaks. 

snackersdelight.blogspot.com
"Close the door! We're getting dressed here!"
You filling should be stiff enough to hold a peak, but not so dry that it has no shine to it.  I cold eat these just like this, but I promised you caviar.  I got my eye on that one in the front though.  Mmmm!

snackersdelight.blogspot.com
"Three's a party!"

Using a plastic spoon of knife drop a small lump of caviar on each and accent it with a very small sprig of fresh dill.  You don't want to use metal utensil when serving your caviar because it ruins the taste.  The material of choice for serving caviar is Mother-of-Pearl.  Mother-of-Pearl is non-reactive material and it lets caviar's fragile taste shine.  You can read more about caviar spoons here.

snackersdelight.blogspot.com
"Umm...where did everybody go?"
 Oh look at you...all dressed up and no where to go?  Come to momma!


I've attached links below that I feel may be of some use to you.  Check them out and let me know what your think:

,
Saturday, March 24, 2012

Salmon Mousse in Belgian Endive Boats

SnackersDelight.blogspot.com Endive Boats with Salmon
Salmon Mousse in Belgian Endive Boats
It is raining cats and dogs here! While I was out going to the movies (Hunger Games) and running errands I got drenched.  The tune in my head all day has been "April Showers bring May Flowers!" and I swear the grass is so much more verdant than it was yesterday.  Unfortunately though, this driving rain is stripping the Cherry Blossoms off the tree branches prematurely. 

I threw together a really quick snack this afternoon, nothing too fancy or expensive, but can be served for an elegant lunch or party.  I love when they pass trays at wedding receptions or cocktail parties that have something served in an endive leaf. 

snackersdelight.blogspot.com
Belgian Endive
Endive leaves are the perfect snack canvas.  They are crispy, bite size and have a very neutral flavor.  They are extremely low on the glycemic index and are strongly anti-inflammatory. You can read more about the nutritional value of an endive here.

After peeling off of just the two outer leaves this is what an Belgian Endive look like.  And yes it is pronounced On-deeve.

I'm not sure why but I picked up some Vegan Cream Cheese instead of the full fat regular Philly Cream Cheese.  I'm not vegan, but I figure slipping a few vegan foods into my diet once in a while couldn't hurt.  Vegan crean cheese made from soy kinda tastes like the real thing, although I haven't tried it spread on a bagel or anything.  The jury is still out.

4oz. Smoked Salmon, 2T Fresh Dill, 2oz. Cream Cheese, Juice half a Lemon, Black Pepper to taste


 I whizzed 4oz. Smoked Salmon, 2T Fresh Dill, 2oz. Cream Cheese, Juice half a Lemon, Black Pepper to taste up in the blender, the one I used is a ninja.  No really it's a Ninja Kitchen System 1100 , its got like six blades and a uber powerful motor that just eviscerates any and everything you could possibly put in it.  

After cutting the bottom from the endive I removed the leaves one by one and set them on the serving plate.  Spoon the mousse into a Ziploc baggie.  (Ugh! Unfortunately I couldn't locate my brand new never used pastry bag!)  Pipe a good amount of mouse into each leaf.


 I garnished these with a caper, lemon zest and red caviar (lumpfish).  Kick back and enjoy!  Now I am going to fix a cocktail and relax!

Have you ever tried Vegan Cream Cheese?  Let me know what you think.

Get your own Ninja!
 

Sunday, March 18, 2012

Candied Citrus Peel

 
Even though this recipe can be a bit laborious it is totally worth the effort.  Citrus peel has such a zingy flavor that just perks up the pallet. I dipped half of each peel in chocolate, but they are just as yummy without the chocolate. 

My childhood friend Alexa had mentioned on Facebook that she wanted some of these Candied Citrus Peels so I figured I'd whip up a batch.  She is sending me great stuff all the time.  The last thing she sent me was one of her "Bags-of-the-Week".  Check out here blog and see what she creates using re-purposed items around the house.  

Okay Candied Citrus Peels!
You'll need:
4-5 citrus fruits (I used 2 oranges, 1 grapefruit and 3 lemons)
4 C water
2 C Sugar
More sugar for coating
Dark Chocolate Baking Bar -optional


Cut each fruit into quarters and remove peel.  Try not to tear the peel. 

 Using a sharp paring knife remove as much of the bitter white pith as you can.

  Slice the peels into 1/4-1/2 inch strips

Boil for 20 minutes in a large pot with enough water to cover. Drain and repeat this boil process one more time. Drain and set aside.


In a large pot add the 4 C water and 2 cups sugar, heat to dissolve sugar.  Add parboiled peels.  Bring to a boil them lower to a simmer.  Simmer on med-low for 1 hour.  Brush the insides of the pot while cooking with hot water and a basting brush.  This will help get rid of the crystallization of sugar on the sides of the pot.


Once your peels have simmered for an hour allow them to cool in the syrup.  When cool enough to handle roll each peel strip in the additional sugar and place on a rack to dry over night. Store syrup in an airtight container in the fridge and use it to sweeten teas, fruit juices or pour over ice cream etc.

  
If you want to eat them today, place them in a 200 degree (or the lowest setting) oven for about 2 hours.


Melt dark chocolate in a double broiler and dip all or half of each peel, let dry for a few hours.


FINALLY!!! It's time to enjoy all your efforts.  Can you believe how long it takes to make these candied peels.   Luckily the citrus oil bite will slow the kids down so you'll have a chance to enjoy them for a while.  Enjoy!

Crispy Baked Parmesan Asparagus Spears

Asparagus! Either you love it or you don't! I love it! Even more so baked.  Baking asparagus in the oven rather than steaming it won't leave your house smelling sour.  Plus it comes out so sweet and still has a fresh crispness to it.  Yummers! 

One cup has more than your daily allowance of vitamin K. And it's a great source of folate, vitamin C, vitamin A, thiamin, niacin, tryphtophan, fiber, and vitamin B6
Look at how crunchy they are!  These are not fried either, that's crust comes from using Panko bread crumbs. 


You'll need:
15-20 Fresh Asparagus
2 egg whites
1 C Panko bread crumbs.  I used plain, but seasoned ones would be great too!
1/2 C flour
1/2 C finely grated Parmesan cheese
salt & pepper to taste

Mix the panko, flour and Parmesan cheese, salt & pepper in a large plate.  Set aside.

Place a wire rack in a cookie sheet and spray it with a non-stick product.  To make sure there is good heat flow I used a rack that stands about 4-5 inches above the sheet. 

Snap each asparagus spear to remove the woody end.  Just bend the spear and it will snap on its own in the correct spot. 
 Stir the egg whites with a fork just to break them up.  Roll the snapped spears in the egg whites to coat.

Dredge each spear in the panko-cheese-flour mix.  You can put the spears back in the egg white and dredge them a second time in the panko mix, if you want an even thicker crunchy crust. 

Place the asparagus on the wire rack and bake in 425 degree oven for 15-20 minutes.  Serve immediately while hot.  They are good at room temperature too, but aren't as crunchy. 

 I served mine with my trusted friend Siriacha sauce. Enjoy!

Monday, March 12, 2012

Lobster Cucumber Cups

Well my intention was to make Lobster Lettuce Wraps, but the lettuce I had on-hand didn't work out well for photographing.  The wraps were delicious though.  So, rather than scrap the recipe I decided to change the delivery method and serve it up a different way. 

I can see serving these at a spring luncheon or bridal shower as an appetizer and they are wonderful just as a snack.

Aren't they cute?!!!

Here's how to make them:

I used 3-4ounces of Lobster meat from the Seafood department frozen section.  It's just quicker and easier. Chop it into large chunks.


Half small onion chopped
1 clove garlic minced

2T cucumber (diced), 1T red bell pepper (diced),  a few cilantro leaves for garnish.  I like a Serrano Pepper for some extra bite.

 I minced the Serrano Pepper. Don't be a hero, remove the seeds and membrane!

Saute your onion and garlic in a tsp of olive oil until they are golden brown about 3 minutes.  Remove from the heat then add your Lobster chunks.


Add some Asian sauces like, 1tsp Hoisin Sauce, 1tsp Asian Peanut Sauce, 1tsp Soy Sauce stir to mix.


Spoon lobster filling into lettuce leaves, fold sides of leave into center and roll. This would work better with a bib lettuce that forms a natural cup.  I had on-hand green curly lettuce which is too floppy, for photo purposes, but tasted fabulous.

Instead I reworked the delivery method by using cucumber cups 


Take a citrus zester and pull it along the skin of a large cucumber to form a decorative look.  Cut 1 1/2 inch sections from it. 
Using a melon baller remove the seeds, but be sure to leave some cucumber flesh at the bottom so your filling doesn't fall out.  

Sprinkle a few granules of kosher salt into your cup, then turn them upside down on a paper towel to drain for 10 minutes or so.

Spoon your filling into the center and garnish as desired.  Serve with extra Hoisin sauce and Sriracha on the side.  

 Lobster Cucumber Cups....These are so fun!

Let me know what you think? Did you try them?

Friday, March 9, 2012

Ahi Tuna Poke with Gomo Wakame

 I had this crazy craving for some really good sashimi today!  When I was in California last year I ate this stuff nearly everyday.  I'd dress up my grand daughter put her in the stroller and off we'd go to the local grocer.  The only difference is they used salmon instead of the traditional ahi tuna.  Poke (Po-kay) means tiny little pieces in this case tuna.  Because the tuna is uncooked and fresh it has a nice meaty texture, but is still very tender not mushy however.   I served mine today with a side of Gomo Wakame which is seaweed salad. 


So on the way home from work I picked up a 6oz. sashimi grade Ahi Tuna Steak from Wegman's.  I recommend the raw tuna at the sushi bar not at the fish counter.  Sashimi it is intended for raw consumption and is handled with a higher standard of food safety in mind, (so I tell myself). 

Now, this is not traditional Hawaiian poke as I didn't have some of the ingredients, but as you know I make due with what's in the pantry. 

After dicing the Ahi Tuna steak into 1/2 inch cubes I mixed it with about 1/4 cup Soy Sauce, half small onion minced, 2T  Gomo Wakame chopped, a pinch of red pepper flakes, 1 garlic clove minced.  Let it set in the refrigerator covered for about 30 minutes. 

Serve it on a bed of lettuce and sprinkle with toasted sesame seeds.  Grab a pair of chop sticks and Enjoy!!


Note: this is one of those foods that must be eaten at the time it is prepared.  If you let it sit around the texture goes horribly wrong. 

Here's a link to a video of how to make Spicey Ahi Tuna Poke.